Thursday, December 30, 2010

Supah Slammin' Slow-Cooker Pork!! ZOMG

For those who don't know, I recently treated myself to a slow cooker/crock pot for a holiday gift (for myself) because I've been seeing all these amazing recipes for it and I've never owned one before.  The whole point was to find something I could prepare myself in 15 minutes before bed, set it and sleep the whole day, then have a really delicious meal ready when I wake up.


At first, Tammy was pissed that I'd gotten it, thinking that I wouldn't need her anymore, but I took a little while to sit her down and explain that the thing isn't her rival, it can be a tool *she* can use to make things easier on herself. So to reinforce this, I had her assist me in whipping something up for it yesterday morning. With the help of some plastic crockpot liners, she soon understood what a blessing this machine is. After the meal it came out with for us last night, I wonder how the hell I survived 32 years without one of these fucking things.


Oh. My. Fucking. God. Was this the bomb diggity. This raised the bar on bomb diggity.  This was like..... fucking phenomenal!!! This was like pure, holy, concentrated win in a bowl. Bad luck will avoid you for 24 hours by just having this in front of you. No joke.

Now that we've gotten that out of the way, allow me to explain what you're looking at. I took a medium pork rump roast, nothing too fancy or expensive. (I don't remember the poundage) We cut up about 7 or 8 large white potatoes, skin and all. Diced up a large spanish onion, 3 cloves of garlic and one and a large red apple without the core. Tossed everything in except the meat. What I did was, in a separate bowl I crushed up about 1 Tbspn rosemary and thyme and a few dashes of smokehouse maple seasoning (which I love with a passion and put on nearly everything). Tossed it into the potato/onion/apple mix and tossed it until it was coated evenly. Then I mixed a little more of the herb mixture plus a dollop of honey and used it as a rub for the pork roast. Once that was done, I placed it on top of everything, filled the machine up about halfway with chicken stock and let it simmer for about 8 hours.

What I got was pure heaven. Neither of us could get over how amazingly good the food came out. I made a believer out of Tammy. And you know what the best part of this whole thing is??

I call dibs on leftovers!!! MWahahahahahahahahahahahahahahahahahahahahahaha!!!!!!!!!!!!!!!!!!!!!!!! LOL

Sunday, December 19, 2010

Perfect Christmas Gift For The Chef Who Has Everything.

LOL Yes, they're serious. Can you imagine actually getting this for someone? I'd never go over their house for dinner again. This isn't an original idea by the way, I've been fantasizing about jerking off into my dishes for years. At least you know my semen is clean. Not sure if I'd trust 99% of the semen stock out there with all those STDs running rampant. Dig? I wouldn't eat any of this stuff in a restaurant unless I see the chef's medical report first.

Still, might be worth looking at... y'know, for a gag gift or something. WAY more creative and original than a blow up sheep. I'm just sayin'.

Thursday, December 2, 2010

Thanksgiving. Blarg.

Yeah, so.....getting stuck doing a double-shift at work kinda demolished any hope for a decent preparation for my Thanksgiving dinner. Tammy and I were supposed to go shopping that Sunday but I went over the local circulars from online and recited a list for her over the phone. None of the supermarkets near me offered deliveries, and the other chains who did wouldn't deliver to my zip code. It was too short notice for Fresh Direct and frankly they're WAY too expensive. Tammy was a star though, I must admit, and got as much as she could with what little money she had. She even came to my job to keep me company and did more shopping while I caught a few hours rest.

There was an aggravating hangup Sunday night when I got back to work, my dad's stupid, annoying bitch of a girlfriend, Sher whom I would like nothing more than to bounce her head off the wall a few times... *Grumbles* ... left a voicemail on my phone. When I invited my old man a week before, he asked me if she was invited along with him and said if the answer was no, he wouldn't tell her about it. Well, I don't like her and didn't want her endless, retarded drama fucking up the mood of the party so I told him to leave her home. He swore he wouldn't tell her but my gut said different.  She sounded all sad on my voicemail saying he had told her I didn't want her at the party because she was a drama queen. Did I deny it? No. I may be a complete chauvinistic douchebag at times, but I will stand behind my douchebaggery. I told them both to stay home; fuck 'em. Pissed me off and left me in a real sour mood the entire night into the morning. When I got home on Monday morning for my weekend, I was straight up dumb tired, but the drama wouldn't leave. My old man kept calling me back telling me she wouldn't leave him alone until he told her and begged me to invite her along so we both could hear the end of it. As much as I hated giving into the insipid whims of a demanding cunt with a princess complex, I had no strength to argue.

So the sudden additional guest meant more food, more pressure and less room. I would never have gotten it all done without Tammy's help. But together, she and I pulled off Thanksgiving.


This is the spread we had going when guests began arriving. (Minus Camille's iced cappuccino blocking the view of Tammy's cheesy dip) Nearly the entire menu was gluten-free, which I'm very proud of, by the way. On the table from left to right, dishes are as follows: garlic spinach artichoke dip with veggies, Tammy's cheesy dip, my spicy/sweet pumpkin seeds, an elaborate cheese and deli meat platter, (cheddar, provalone, american, fresh mozzarella balls and monterey jack, ham, pepperoni, and prosciutto) with crackers and Tammy's stuffed mushrooms squeezed on to save room. Dark chocolate-covered pretzels, jar salsa, bigger rice crackers, tortillas and ridges. Up on the tree skirt next to Tammy's chipmunk plushies is her fried veggie eggrolls and wise honey BBQ cheese doodles. (Which are the bomb diggity, by the way, in case you've never had them)

I must say, out of all of this, Tammy's eggrolls and my spinach artichoke dip were probably the biggest hits.
I put the recipe up on grouprecipes if you're interested. I can't get you Tammy's eggroll recipe, she never writes anything down and never cooks something the same way twice.

Altogether, we had a decent turnout. I had to borrow a folding chair from Camille's house because we just didn't have enough seats. As is, because of Sher's impromptu appearance, we were still short a seat which was awkward. A host a heart, I sat on the floor.

Nick, my old boss and good friend came soon after, bringing more white wine. Sher made my old man so late, they didn't show up until after 8. Dani showed up as soon as she could get out of work, which wasn't long after that. We had salad with endives, spiced pumpkin soup, tilapia cakes with sliced lemon, potato au gratin, beef roulades stuffed with minced onion, garlic and bacon, and for dessert you had a choice between samoa cookies or italian 7 layer rainbow cookies. Dani promised me a birthday cake but since she came straight from work, that didn't happen. No problem, I love Dani like a sister but my GAWD is she an abysmal pastry chef. Last time she baked us an angel cake for a BBQ, it tasted like a dirty dish sponge. /=P

Sadly, because we entertained one more person than expected, we didn't have enough of the roulades to go around. And because I was so busy preparing, I failed to take pictures of everything. Though I did manage to get a shot of the fish cakes after I spent several hours mixing and shaping them.

 I don't have the recipe for you in exact measurements. I know it took a lot of eggs, a lot of potato starch, tapioca flour, xanthan gum, crushed corn flakes, red bell pepper, leeks and tons of herbs and spices... but it was like 2 in the morning, I was exhausted and I didn't keep track of what I haphazardly tossed in there. They came out really good though, they didn't taste gluten-free at all. In fact, three of the guests insisted on taking the leftovers home. I don't have a pic of these done, but they were not unlike their salmon predecessors that gave me the brilliant idea for this dish in the first place.


Did I ever show you these? About a week before the party, I made a single salmon fillet stretch for Tammy and I this way, along side spanish rice and beans with diced jalapeños. That recipe is on GR as well, but it's most definitely NOT gluten-free.

It's wasn't a bad party, but Sher was annoying and I wish I hadn't been pressured to invite her. She broke one of my wine glasses, and knocked a big bowl of soup to the floor, wasting it. She also contaminated Tammy's cheesy dip by putting her fork in it, leaving pieces of everything she ate floating around in it. It was gross; nobody touched it after that and Tammy was furious. A part of her still is. It pisses me off that annoying people get what they want simply by being more annoying. If you're not wanted somewhere, don't fucking show up. And if you manage to emotionally strongarm the people who influence that person, don't be a shitty guest. Mind your goddamn manners, pay attention to what you do, how you act and count your blessings because that dumb bitch didn't, and will not be invited next year no matter how much she cries on my voicemail.

Wednesday, October 27, 2010

Salmon Stuffed Shells Gets Your Date Wet

This is something I make only for those I care deeply for. It's rich and decadent; it inspires warmth, love and comfort. it will make someone who hates fish absolutely love it, and those who love fish cream in their pants.


Ingredients
1 Large salmon fillet
Grated zest of 1 Lemon, Juice of 1/2
1/3 Cup Chopped fresh Dill
1 Leek, rinsed well and diced
1/2 Cup White Wine
1/2 Cup Grated Parmesan Cheese
1 Tbspn Parsley, Separated
About 1 tspn each garlic and onion powder, separated
1 Large egg
Plain Breadcrumbs
Jumbo Stuffing Shells (I used a little more than half the box)
Salt and pepper to taste
Your favorite Alfredo sauce, fresh or jarred.


Method
Preheat oven to 350 F.
Rinse the salmon fillet under cool water. Make shallow slices in the flesh and skin, then set it in a roasting pan.
Add lemon juice, wine, 1/2 teaspoon of garlic and onion powder, and a few sprinkles of the dill and parsley. Bake at 350 for 20-25 minutes until cooked through. When the fish flakes off with a fork, it's done. Set aside and allow the fish to cool a bit.
In the meantime, boil water and cook the stuffing shells to al dente'. When they're done, drain them and set aside.
When it's cool enough to handle, flake off all the meat from the skin and put it into a large mixing bowl. Add the lemon zest, cheese, diced leeks, chopped dill, the rest of the parsley, garlic and onion powder, salt, pepper and enough breadcrumbs to coat. Mix well.
Only add the egg when the fish has cooled down to room temperature, or you'll risk the egg cooking right in the mixing bowl. That would be gross.
If you need more breadcrumbs to make the consistency of the mix better, by all means, do so.
In a large baking dish, spread a thin layer of the alfredo sauce on the bottom as a bed for the shells, to prevent them from burning.

You don't need that much to coat the pan. I pulled this recipe off with one jar of store-bought sauce. Go for either Classico, Newman's Own, Barilla or Francesco Rinaldi. Ragu SUCKS. America's Choice SUCKS. Prego tastes like vomit. Or, you can go all out and make your own. If you don't have a good Alfredo sauce recipe, you can find tons online. A good example is this one from Group Recipes by Rodeogirl73.


So now that you have your mixture, take a large fistful of it and stuff the shells, lining them in a single layer inside the dish. You can keep them as close together as you want.


Drizzle the alfredo sauce over the shells liberally, filling in the spaces between them if you have enough.
Bake at 350 for 30-40 minutes. Remove from heat and let it cool for 2-3 minutes before serving.
Garnish the shells with extra parmesan, parsley and/or dill for color if you feel like it. Not only is it pretty, goes great with Chardonnay, but it will totally get you laid.

I'm not kidding. If it worked for me, it can work for anyone. You too. Try it! This is especially effective when followed by  dense chocolate brownies.

No joke, you'll be a star.

Cranberry Butterscotch Cookies!!!

I threw these together based very loosely on the oatmeal cookie recipe on the back of the old fashioned oatmeal lid, only I tweeked it as I often do. They came out slammin'. Make these or Satan will rain down acid and melt your family. No, he probably won't, but you should make them anyway, just to be sure.


Cranberry Butterscotch Cookies
Ingredients
2 - 2 1/2 Cups AP Flour
1 1/2 Cups Old Fashioned Oatmeal (The original recipe said 2 cups. I wanted them oatmealy but not overwhelmingly so. This measurement gives you a perfect balance so the other ingredients shine through.)
1 1/2 Sticks of Butter, unsalted
2 Eggs
1 Cup packed Brown Sugar
1 tsp of vanilla, cinnamon, baking powder, salt
1/2 tspn nutmeg
1 Cup Butterscotch Chips
I put 1 full Cup of Craisins but it turned out to be a little too much, you may want to cut it down to 2/3 Cup.

*Secret Ingredient: I made a little boo-boo and while going for the salt, I accidentally sprinkled a little black pepper in the mix. (Damn those salt & pepper shakers looking identical! Whose frickin' idea was that??) I was really worried it would effect the taste but it didn't. In fact, I think it brought out the nutmeg a little bit. lol Still, I wouldn't suggest adding it on purpose unless you're feeling really adventurous.


How to make it
Cream the butter at room temperature with the oatmeal and flour.
Add the sugar, baking powder, salt, cinnamon, vanilla, and nutmeg, mixing very well. Use a rubber spatula (Or as they used to be called, "baby cheaters"), a spoon, an electric mixer or even your hands if you have to.
Add the cran-raisins and butterscotch chips last after the dough is mixed thoroughly. This will prevent any one ingredient from clinging to the fillings and making the cookie taste weird.
After it's all mixed, cover it with plastic wrap and put it into the fridge at a minimum of an hour, or even overnight.
When you're ready to make them, preheat the oven to 350 F and scoop cookie-sized balls about an inch away from each other on the cookie tin. Keep in mind that they will not melt or flatten from their original shape while in the oven so if you want them to be a flat cookie, you must do it by hand before they bake. If you prefer them all melty, I guess you can mix in a bit of milk to the batter.
You don't have to grease the cookie tins because the batter already has butter in it. They should come off easily with a slight push from a metal or plastic spatula. Bake them at 350 F for 12 - 18 minutes, depending on how big they are. When you check on them, flip one over and if the bottoms are evenly golden-browned, they're done.

Scoop them onto a plate lined with paper towels and eat them warm. They're so SO SO good, and perfect for the season!!

I have no idea how many cookies this recipe yields, as Tammy and I were eating them as I baked them, but I can tell you it makes enough to fill at least 5 to 10 people, and you'll still have a few to take to work the next day. Nummies!

Thursday, October 21, 2010

Shortcut "Sin" Buns

If you're short on time and short on green, this is the perfect way to satisfy the collective sweet tooth of a large family or a lot of dinner guests and look like Martha Stewart in the process; albeit a really ugly, butch, brunette version of her, but you get the idea. This isn't my best cinnamon bun recipe, meaning I do know how to make cinnamon buns from scratch, but I've yanked this particular trick out of my sleeve on occasion when I'm in need of a quick, cheap fix.

You shouldn't be too proud to take shortcuts, they can be your lifeline when you're in "headless chicken" mode. Trust me, I've been there countless times.

The list of things you need to make this is so short and so inexpensive that you'll wonder why you never thought of this yourself. (If you have, mazeltov!)

No really, that's it. Just bargain brand biscuits, brown sugar, cinnamon and a tub of vanilla frosting, which isn't shown. And if you don't have the time or the money to get vanilla frosting, you can opt for the homemade version instead:

Thick Vanilla Frosting

1 cup butter (or other shortening)
2 teaspoons vanilla extract
4 cups powdered sugar (sifted)
4 tablespoons milk

Beat together butter and vanilla for 30 seconds medium speed with an electric mixer. Add 2 cups of powdered sugar a bit at a time while beating. Then add 2 tablespoons milk. Slowly add in the rest of the powdered sugar and the rest of the milk until you get the right thickness for your frosting.

Okay, so now that we've covered the ingredients, we'll get onto how to create the cheapest cinnamon buns of all time. Still with me? Good.
I like using wax paper for my work surface, it makes cleanup SO much easier. Plus, it gives you a place to spread out your dough. You'll need two biscuits for each bun. The bargain brand biscuits are skimpy so it takes at least two of them to make a decent-sized bun. You can use three to make them even bigger but it will yield less buns. If that's fine for you, like if you have less people to feed, by all means go for it. After mixing the cinnamon and sugar, all you do is roll the dough out and spread the mixture evenly over it, then roll it up, like this.

You can roll it up to look like a traditional cinnamon bun, or much like a croissant. Whatever you feel like. It may take you a few tries to get it tight enough or in the shape you want. Don't be afraid to unroll it and start over. You can even sprinkle whatever mixture you have leftover on top of the rolls. It's so good! You put them on a greased baking dish in the oven that's been preheated to whatever temperature the tube says the biscuits are supposed to bake at. Then let them cook until golden brown.


Okay, maybe not THIS golden brown, (I forgot about them, whoops) and they drooped on me which sucks. I've been making them this way for a while and the only method I've discovered that will keep them from drooping is to pack them really close together in a deep dish... but then they don't get done evenly so it's a trade-off. *Sigh*

This part is kind of important... you should ice the buns while they're still warm. This way it melts the icing and you get that appetizing drip effect. See, I didn't do that because I was busy making other stuff simultaneously so by the time I got back to the buns, they had cooled off.


Fail. At least they tasted good.

Whatever. Here's the recipe for ease of reference.

Shortcut Sin Buns

Ingredients:

2 tubes of bargain brand homestyle or buttermilk biscuits
1 tub of vanilla frosting, any brand (You can even make it yourself)
Give or take about 1 Cup of Dark Brown Sugar
1/2 to 2/3 Cup of Cinnamon

How to make it:
Preheat the oven to 400 F or whatever the tubes say to bake the biscuits at.
Lay down a sheet of wax paper over your work surface, or you'll have a lot of cleanup afterwards. Trust me on this.
In a separate bowl, mix the brown sugar and cinnamon; make sure it's blended well.
Take two biscuits and roll them out into a long, thin strip. Lay the strip down onto the wax paper and flatten it. Use a spoon to fill the strip with the cinnamon-sugar mix, spreading it evenly.
Carefully roll the strip up into a bun-like thing.
When you have them all rolled, use whatever cinnamon-sugar mix you have leftover to sprinkle over the top of the buns.
Arrange them in a greased baking dish and bake until golden-brown. They may come apart, even if you think you pinched them closed really tight. It happens to the best of us.
While they're still warm, spread the icing over them generously.

Eat, drink lots of milk with them and enjoy.

Honey Dijon Chicken Stew


This tastes even better than it looks. It was inspired by a Lean Cuisine meal that I fell in love with.


Only instead of the green beans, cranberries and almonds, I worked with what I had, which was carrots and broccoli. The sauce was a bit too spicy for my liking, probably because of the dijon mustard mixed with too much montreal chicken seasoning, but the flavor was amazing so I dealt with it. That's what I love about stews, you can just use whatever and it comes out great. If I remake this, I'll be sure to use less spices and more honey. There's nothing more dangerous than having damaged taste buds and a sensitive stomach. I want to add the green beans, cranberries and sliced almonds next time too. Gawd, that's delicious. If you haven't tried this Lean Cuisine meal yet, I suggest you do, then you'll see what I mean.

Somebody remind me, I have a recipe for chicken salad which I want to post up here. I cloned it from the Starbucks Tarragon chicken sandwich that I love so much; it's also made with cranberries and I think it would be a good post for around Thanksgiving. Using leftover roasted turkey meat instead of the chicken would make it ten times better.

But I digress! Back to the honey dijon stew.


This is almost as easy to make as my Doy Sauce. (patent pending) The garlic pepper was sent to me from my good friend in the UK, wenchie. Most of it was raped because Tammy absolutely LOVES it and uses it in everything she makes. You can use just about anything in it, and I think next time I will try it with fresh garlic, chopped cilantro, ground ginger and cumin.

The rest is easy. Just chop things into bite sized pieces and sauté until done. Yes, I use the little leaves that come off the stalks of fresh broccoli. If you can see towards the lower left-hand side of the pan, I started with the onions, allowed them to caramelize and scraped up all that lovely brown stuff off the pan using chicken stock. That makes the bedrock of my gravy, adding dimensions to the flavor, even if it's cream-based. I just love using that trick and it's never steered me wrong.


Normally I would add herbs and spices directly onto the stew as it cooks so they have a chance to infuse, but this time I let the flavors marry in a separate bowl with the honey dijon sauce.

Once the broth reduced enough, I drizzled the sauce over everything and stirred it well. It looked a little thin at first but when I cut the heat and let it sit for a few minutes, it thickened up. If it doesn't do the same for you, there's no harm in stirring in a little corn starch or flour/water mixture to help things along.

I served this stew over jasmine rice, which I figured would add to the sweetness of the meal, and I was right. Though it would be awesome over just about anything, really.

Try it, and maybe that slammin' Lean Cuisine meal and let me know what you think.

Honey Dijon Chicken Stew

Ingredients:


2 Large boneless chicken breasts, cut into cubes
1 large head of broccoli, chopped
3 carrot sticks, shaved and chopped
1/2 large spanish onion, diced
3 cloves garlic, diced
1 Cup honey
1 Cup Dijon mustard
2 Tbspns lemon juice shopping list
1/3 Cup white wine (generous rim shot)
1/2 Cup chicken broth
Montreal chicken seasoning and garlic pepper to taste
1 Tbspn vegetable oil, for caramelizing the onions and garlic

How to make it:
 
Sauté' the onions and garlic in the vegetable oil and allow to caramelize for 2-3 minutes until edges are brown.
Add chicken and chicken stock (Stand back- it will sizzle!) Let it simmer and marry for a few minutes before adding the veggies. Or, you can just dump everything in there at once, see if I care.
As it's cooking, add the wine, lemon juice and mix thoroughly.
Let it simmer over a medium flame and allow the chicken to cook through, about 15-20 minutes.
In the meantime, prepare the Dijon sauce in a separate bowl by combining the mustard, honey and spice blends, mixing well.
When the stock has reduced, drizzle sauce over the stew, mixing well. If by a few minutes it doesn't thicken naturally, you may add a thickening agent if desired. Serve over rice, pasta, potatoes, whatever you like.

Most importantly, enjoy!

Wednesday, October 20, 2010

Samoas. Nuff Said.


Oh yes, the famous girl scout cookie, the Samoa has at long last been made and perverted by yours truly. Everybody loves these things, they're like crack. And they're SO easy to make, it's almost a sin. This past Tuesday, I woke up and had the house to myself since Tams was at work. She left me a note asking me to make her something sweet for when she got home. I've been meaning to bake anyway, so I went looking through grouprecipes and finally found this on henrie's page. I already had some coconut in the house, so I said screw it, got the rest of the ingredients from the store and went to town.


They tasted EXACTLY the same as the commercial grade, only better. Yeah, no seriously, these were friggin fantastic and I'm uber-proud of myself for pulling these off.

The secret to this recipe is in roasting the coconut. If you don't, your cookies will be shit. All you have to do is spread about 2 cups worth on a pan and bake it at 350 F until lightly browned, stirring it occasionally. Henrie's recipe says it takes 5-6 minutes, but I'm telling you it may take almost twice as long to get it evenly done.

Another little secret of success is to get the timing of the batter down right. This might prove to be a problem though because you need to babysit this batter hardcore or it will burn. What I did was make the batter first, then I remembered the coconut needed to be browned and freaked out a little. So while the coconut was roasting, this batter became like cement in the pan and I had to keep stirring it. What I would suggest is that you roast the coconut first, then while it's out and cooling (Or maybe left in the oven on the warm setting) then you make the batter. Working with the batter fresh would have been worlds easier. Don't be a schmuck like me.

Okay, so when your batter and your coconut is ready, you marry the two. Mix that shit in well because once it starts cooling, it will be a giant pain in your ass.

Forming the patties on anything other than wax paper will be too hard, so use the wax paper. Trust me on this, okay? Because of how tough the batter was at this point, flattering these out was a task. And no, I didn't put those stupid little holes in the middle. To me that's like eating half a cookie. You can make them any size but this batch yeilded 34 cookies. If you make them smaller, you could possibly get more.

The recipe called for chocolate chips melted down. At first I was going to get a bar to melt, but the chips were on sale. I added a bit of salt, and why not? It tasted good. I don't have a bain-marie (double boiler) so I created a ghetto-style one out of a regular pot and my large mixing bowl. It did the trick. When it was all melted, I made a ghetto-style pastry bag by scooping the still boiling hot chocolate into a ziplock bag and cutting off a small corner. This is a prime example of why you should NEVER put boiling hot melted chocolate into a flimsy plastic ziplock:


Yeah, that was retarded. If you have those white cloth ones, use them. If not, wait for the fucking chocolate to cool down a little bit before you decorate with them. Sheesh, I'm a dillshnick.

I managed to clean them up and salvage them pretty well though, with only two frosting casualties.... neither of which Tammy ever saw. Mwahahaha.

The result was two different styles of frosting, but Tams enjoyed the ones with the thinner frosting better. They looked more dainty, and the thicker chocolate lines were too overwhelming and she couldn't taste the coconut. So the ones with the thick lines were mine, and what I didn't eat, I gave out to friends. She was pleasantly surprised by them when she got home, and said they were better than the boxed ones. It made me happy to see her enjoy them so much. They were even better after the awesome dinner I made, which is the blog coming up next.

For now, I'd like to share this sinfully good and easy recipe with you. And the best part is-- it's gluten free!

Girl Scout Samoa Cookies

Ingredients:
6 Tbspns butter
1/2 cup sugar
1/2 cup Karo light corn syrup
1/2 of a 14 ounce can Eagle Brand sweetened condensed milk
1/2 tsp vanilla extract
4 cups toasted coconut
1 cup semi-sweet or milk chocolate chips

Method:
In a 2 quart saucepan over medium-low heat, combine butter, sugar and corn syrup.
Heat to a full boil, stirring constantly with a wooden spoon. Boil for 3 minutes, stirring constantly.
Slowly pour in Eagle Brand milk, stirring constantly. Continue cooking over low heat until candy thermometer reaches 220-228 degrees.
Remove from heat and stir in vanilla. Beat until creamy. Immediately stir in toasted coconut and mix well.
Spoon by tablespoonfuls into circular mounds onto buttered wax paper. Flatten into disks.
Allow to cool completely.
Melt the chocolate chips and drizzle thinly in stripes over cookies. Let chocolate harden at room temperature. Store in a airtight container in the fridge.
*To toast coconut: Spread coconut on a baking sheet and toast in a preheated 350 degree oven, stirring occasionally until lightly browned, anywhere from 7-10 minutes.

Monday, October 18, 2010

Top 11 Crappy Kitchen Tools To Avoid

There are like a billion gajillion kitchen gadgets out there, and they all look so nifty and useful, especially as an impulse buy at the checkout while grocery shopping and at three a.m. on QVC after you've gotten paid. How do you know which will give you the world's worst case of buyer's remorse?

Follow my advice and you'll thank me one day. Here is my Top 11 list of kitchen doodads you should avoid like the plague. Why 11? Because I've been biting off the Nostalgia Critic for this long, might as well roll with it.
But hey, at least I added a link, right? See, I can be nice when I want to. Now go fuck yourself.

Well, you can read my countdown, and then you can go fuck yourself.


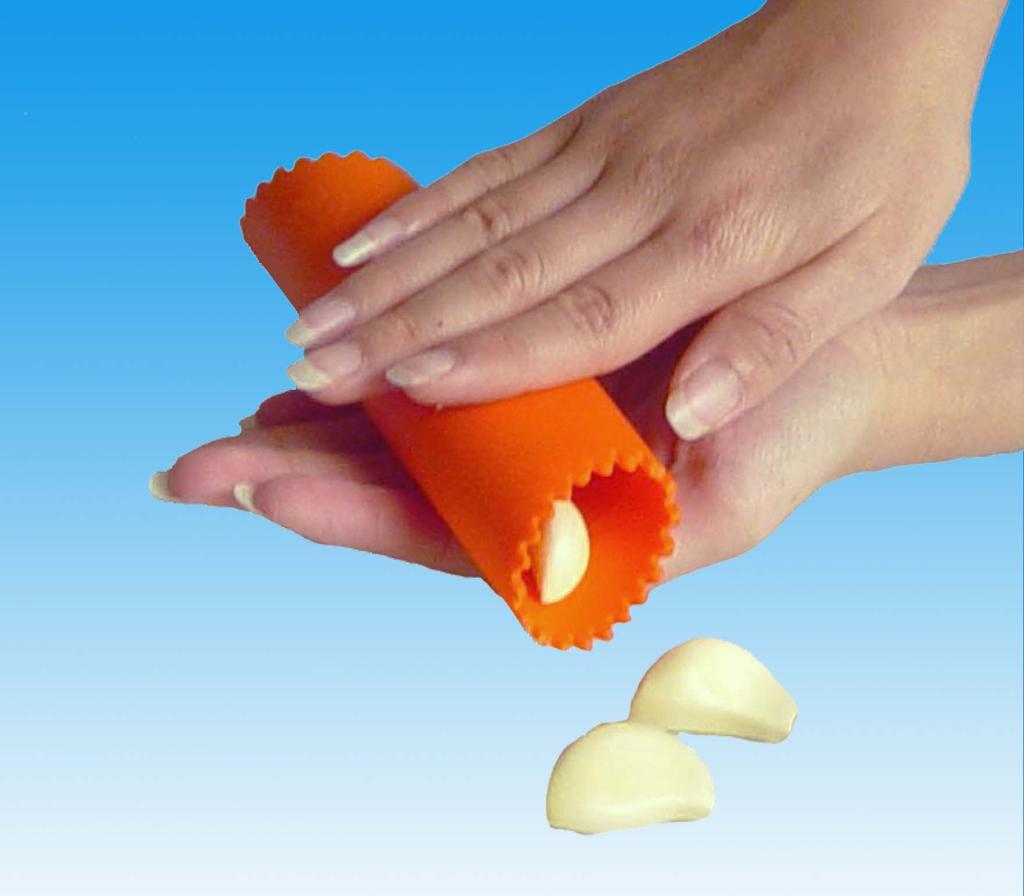
11. The Garlic Peeler
The point of this little hoozajammie is to peel the skin off garlic cloves without getting that garlic smell on your hands. I guess you just roll it around and the cloves magically come out as seen in this picture. This thing is quite literally a hollow tube you're paying anywhere from $6 to $15 for. Is it too rough for you to smash it with something, or roast it in olive oil so the skin just peels right off with a wet cloth? You don't need this.


10. The Flour Sifter
This is a nifty little gadget to sift your flour, weeding out any impurities and giving your flour a lighter consistency, more like cake flour. But unless you're a caterer or run a bakery, you don't need it.  I use a rice strainer, it's easier to clean, and considerably less expensive. I've seen these babies run for as much as $40 a piece.

 9. The Egg Slicer
Ugh, really? Do I even need to go into why this thing is useless? Use a knife. Get your chopping/precision skills down. And if you're making egg salad, use a goddamn fork, for fuck's sake. Or flush $15 down the crapper, see if I care.


8. Citrus Segmenter
This doohicky chops a half a grapefruit, orange or lemon into wedges for $20. Listen... if you can operate a knife well enough to cut a fruit in half, it wouldn't be much of a stretch for you to cut it down the rest of the way, would it? C'mon, people. Seriously.


7. Cake Tester
I'll admit, I fell for this one. I have this exact same model and paid $6.99 for it several years ago. Before I bought it, I used toothpicks which were equally as effective, and available at a 99 cent store. The only time this thing came in handy was for my superbowl party football cake, which was nearly an entire 12" tall. (Too tall for toothpicks) Now, half the time I can't find it in my utensil drawer and end up using toothpicks anyway. Stupid fucking investment.

6. Melon Ballers
Do you really need your melon served in tiny uniform balls? Depending on where you go, these dumb things can set you back up to $20, especially if they have cute little melon shapes as handles. Gawd, they saw you coming, didn't they?  This goes for the melon baller's retarded cousins, the avocado scooper and the meat baller. Lazy schmucks, use a spoon!

 5. Apple Corers
Just. Say. No. Do you have any idea how many apple-related dishes you'd have to make in order to justify a purchase like this?


4. Pasta Measurer
I can kind of see this working if you get into a fistfight outside a restaurant, but inside, real chefs call a pasta measurer your hand, plus a dash of judgment and pinch of common sense. Besides, making too much is also that awesome thing called leftovers. We like that, don't we? Don't be the dildo that blows $12 on this.


3. Kiwi Scoop
If you get this, you're the tool. They make this awesome kiwi scoop that looks a lot like what you already have-- it's called a spoon!


2. The Shrimp Deveiner
Otherwise known as the paring knife. The commercial grade ones can devein, butterfly or fully split up to 100 shrimp per minute. The one for regular kitchens looks exactly like a paring knife, which is funny. The Shrimp Butler is a crank-type thing that does similar to commercial grade machines only slower. It'll set you back about $35 bucks. Just use a friggin' knife.


And by far, the number 1 most useless and wasteful kitchen tool is....

*DRUMROLL*
.
.
.
.
.
.
.


1. The Garbage Disposal
I know a lot of you suburban housewives, co-op and condo owners will want to skin my hide for this, but garbage disposals are the epitome of useless. Not only are they dangerous around idiots and drunk people who like to put glass bottles in there because they like the sound it makes, but according to an independent study by WETA, (an environmental impact group based in Arlington, VA) wastewater that contains a high amount of organic matter is harder to break down in a septic tank or at the sewage treatment plant. As a result, the use of garbage disposals has contributed to increased nutrient loads in rivers and streams, along with erosion, runoff of overused fertilizer. This causes algal blooms and other undesirable effects, like "dead zones" in the Gulf of Mexico. Is it too difficult to peel your vegetables over newspaper, or in a bowl rather than contributing to global pollution? I think the garbage disposal, along with other environmentally irresponsible things need to be banned. I support home composing because whether you're creating more biogas or methane from solid waste in landfills, it has a negative impact on the planet. Composing may be a little more work, but for the future generations, it could be crutial. Besides, there's an old saying that nothing easy ever pays off in the end, and nobody ever meets any resistance going downhill.
Learn more about composting here.  Go ahead, laugh off this blog. Call me a hippy. But in 20 years when the Gulf of Mexico is so toxic that it makes the Volga river look like the Mediterranean, and your grandkids are eating Soilent Green, you'll wish you had put in the extra effort while it still mattered.

Whatever. You can go fuck yourself now. See you at the dinner table, bitches!